HOW TO CREATE VMS FROM CUSTOM IMAGES?
The 0.12 release of Synnefo introduces a new feature: the ability to create VMs from your own, pre-existing machines. And since your machines come in all shapes and colors, the VMs created from them will preserve all your settings such as partition schemes, installed programs etc.
We have created a new tool for this, the snf-image-creator, which you can install on your machine (host machine) and use it to snapshot an existing OS installation. Before you plunge into this guide however, we suggest you read the respective FAQ section where we explain some limits of the Image creation method we present below.
The outline of the creation process is the following:
- Step 1: Install snf-image-creator on your host machine
- Step 2: Create and upload an OS image
- Step 3: Create your VM
Step 1: Install snf-image-creator on your host machine
You can read a detailed guide on how to install snf-image-creator on the Installation section of snf-image-creator's documentation.
Note that since snf-image-creator works faster on virtualization capable hardware, you may want to check if your CPU has virtualization extensions. If it does, then the following command will produce some output:
$ grep -E 'svm|vmx' /proc/cpuinfo
Step 2: Create and upload an OS image
Now that you have installed snf-image-creator, you can use it to create an image of any OS installation that lies on a media, such as a block device or a regular raw file, that can be accessed by your host machine.
In the following example, we will use snf-image-creator to create a clone of an existing ~okeanos VM. You can use the same commands if you want to create an image of your home computer. However, be sure to check out first the Caveats and Limitations sections of snf-image-creator's documentation, which present a few requirements on your OS installation.
You should also know that there are actually two variants of snf-image-creator, both achieving the same results but suited for different needs:
- snf-image-creator is a user-friendly dialog-based program. Its "Wizard" mode is suited for users who want a quick and simple way to upload their OS images.
- snf-mkimage is a non-interactive command line program that receives all the necessary information (account info, image info etc.) as options. It is ideal for scripting purposes.
Let's see both tools in action. The next commands must be entered on the prompt of your host machine (an Ubuntu 12.04.2 VM in this case).
snf-image-creator
In order to use snf-image-creator, simply type:
$ sudo snf-image-creator /
The "/" is used to indicate that you want to create an image of your host machine.
NOTE: If other OS installations exist on the same machine, you can instead create an image out of them. In this case, you would provide the path where they are installed. You can check an example here. This functionality comes in handy when you want to create an image from a Windows OS, as explained in the respective FAQ section.
snf-image-creator will initially check if the media really is a disk or a raw file representing a hard disk. Then, it will use heuristics to understand which OS has been installed on the media. After that, you will be asked which mode you prefer:
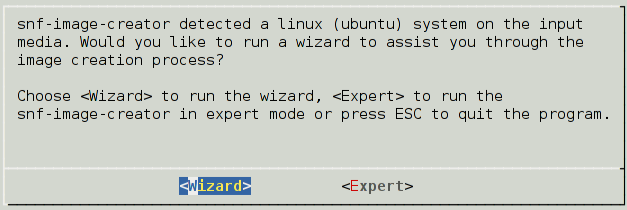
- Wizard mode is intuitive and consists of 4 simple steps.
- Expert mode has an abundance of options but requires a bit of knowledge of the inner workings of Cyclades from your part and thus is out of the scope of this tutorial. You can find out more though, on the snf-image-creator documentation.
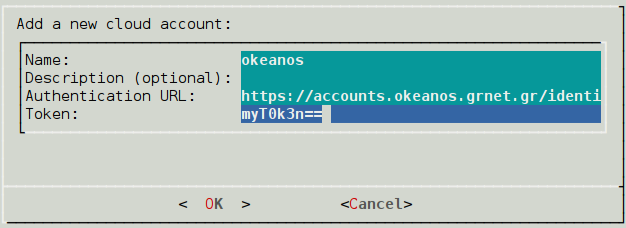
So, for this example you can choose "Wizard". If this is the first time you use snf-image-creator, you will be asked to provide your credentials for your ~okeanos account. Also, the word "cloud" that you see refers to ~okeanos in our context but it can also refer to any Synnefo deployment. More specifically, you will be asked to provide the following:
- Name: This is a name of preference that you can give to this Synnefo deployment (and yes, there are more than one). It can be any word e.g. "okeanos", "trial", "mycloud" with no spaces.
- [Description]: You can optionally give a more detailed description to this cloud entry.
- Authentication URL: This is the URL that you see at the API access tab of your profile in ~okeanos.
- Token: This is the token you can find right below the Authentication URL in the API access tab.
(Alternatively, you could copy your .kamakirc to your VM and the snf-image-creator won't ask you for the above)
For our example, we have used the following setup:
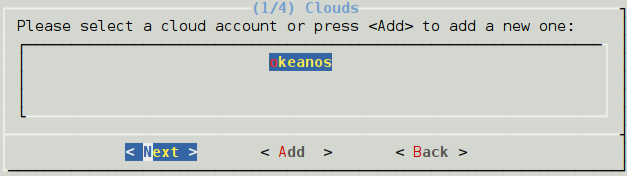
Then, choose the entry you have just created
and provide a name for the ~okeanos Image you want to upload.
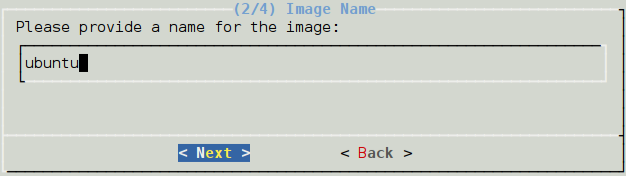
This name will serve as the Image's filename.
Then, provide a description for the Image.
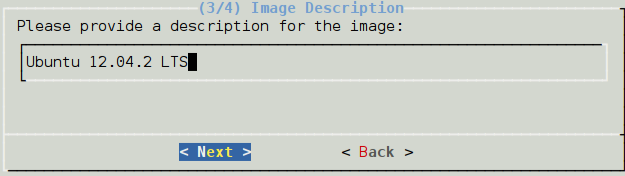
This will be a short description of your Image.
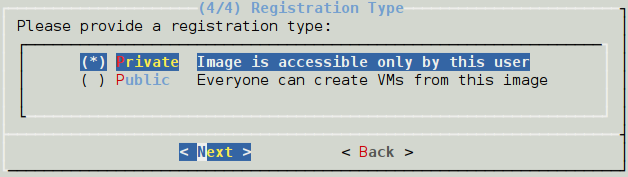
Next, choose if you want to make your ~okeanos Image publicly available or not.
and you're done! A confirmation message will appear on your screen. You can then proceed to the Image creation by clicking "Next". A similar list operations will appear on your console.
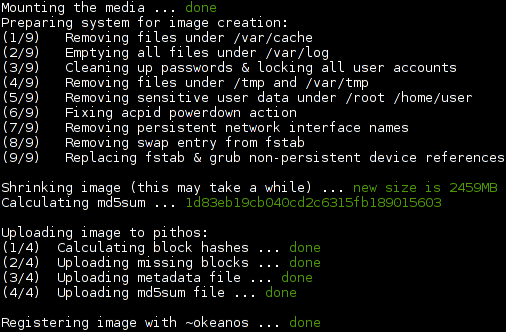
We will comment on the above output briefly.
- Sysprep: Operations from 1/9 to 9/9 are part of the system preparation operations and are best explained in the snf-image-creator's Usage section.
- Shrinking: In order to minimize the image size and the uploading time, we shrink the image as much as possible. You can find out more here.
- MD5SUM: The md5sum of the image is used later on to verify that the image has been uploaded successfully.
- Uploading: Before you upload an OS image, every block is hashed, checked against existing blocks in Pithos+ and finally uploaded, if no other block has the same hash. Essentially, this is data deduplication.
Finally, after the image has been uploaded successfully, you will be asked whether you want to save a local copy of the shrunken image. This is just a copy of the diskdump that has been uploaded to Pithos+ and, in case you are confused, the original OS installed on the media remains intact.
snf-mkimage
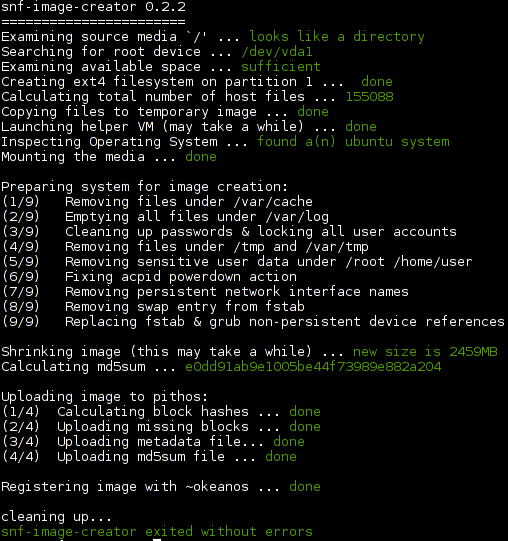
snf-mkimage is the command-line alternative to snf-image-creator. Its full set of options can be found in the Usage section of snf-image-creator's documentation.
This tool is most commonly used with the following set of options:
$ sudo snf-mkimage / -a https://accounts.okeanos.grnet.gr/identity/v2.0/ \
-t myT0k3n== -u ubuntu.diskdump -r "Ubuntu 12.04.2 LTS"
As you can see, these options are exactly what snf-image-creator's steps translate to. You can also see that the output is nearly identical:
Step 3: Create your VM
Creating a VM out of an uploaded custom ~okeanos Image is a fairly simple task. Just select "New Machine", go to "My Images" section and select your Image.

Alternatively, if you want to create a VM from another user's custom ~okeanos Image, you can go to the "Public Images" section.
CYCLADES USER GUIDE
- How to create a VM?
- How do I connect to a VM?
- How do I manage my VM?
- How can I resize the CPU/RAM of an existing VM?
- How can I attach/detach an IP on a running VM?
- How can I add extra disks to my VMs?
- How can I detach an extra disk from a VM?
- How can I add tags to my VMs?
- How can I assign my VM to a project?
- What are SSH keys and how can I use them?
- What are private networks?
- What is a firewall and which one should I choose?
- How to create VMs from custom images?
- How can I access all my VMs using one public IP (NAT)?
- How can I update the VirtIO drivers of my Windows VM?
- How can I add IPv6 nameservers on my CentOS/Oracle Linux VM?